Saturday, March 28, 2009

[Utility] Process Explorer for Software Developers

In my previous post I told you about the Microsoft TechNet site and in the features I have mentioned about Windows SystInternals free utilities for software developers. Let me introduce a tool Process Explorer to show you the relevance of SystInternals tools for a Software Developer. It is an extended TaskManager and can replace Task Manager.

What is Process Explorer ?

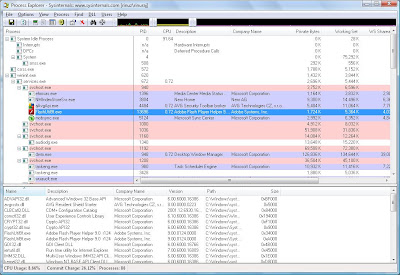
Process Explorer is a system monitoring utility which can be used to track down system problems. Process Explorer is an advanced process management utility that picks up where Task Manager leaves off.


Key Features
  • Detailed information about a process including its icon, command-line, full image path, memory statistics, user account, security attributes etc can be viewed.
  • A particular process can be selected and list the DLLs it has loaded or the operating system resource handles it has open.
  • Powerful search capability that will quickly show you which processes have particular handles opened or DLLs loaded.
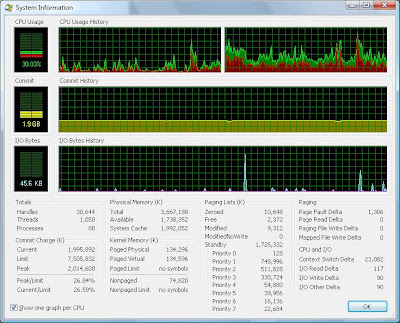
  • System Information & Performance graph can be shown for whole system and for each process.

Download
It is a free ware, you can download Process Explorer from here. .

Note: If you have any memory or process related issue, just try process explorer, you will get additional information about the issue for sure !
Microsoft TechNet for Software Developers

Are you a windows (based) application developer and have you ever heared of Microsoft Technet or visited it's website ? If you have not then you have missed strong knowledge support.
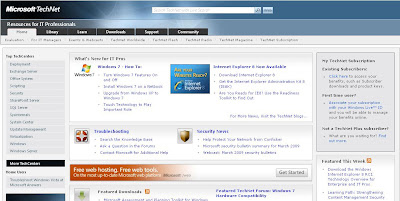
Microsoft TechNet is a Microsoft site for techical information, developer utilities, news, blogs, events for software professionals. It can be accessed through the link http://technet.microsoft.com.


Website features include,
  • TechNet Library is a source of technical information for IT professionals and advanced users. The technical content is freely available on the web
  • TechNet Forums are the web-based forums used by the community to discuss a wide variety of IT professional topics.
  • TechNet Blogs is an exclusive blogging platform of Microsoft employees.
  • Windows SysInternals show cases a collection of free utilities for Software Developers.

So software developers please visit and see what you have here special to make your life easy !

Tuesday, March 24, 2009

[Utility] Team Viewer for remote desktop Sharing/Access support

Have you ever thought of accessing your friend's computer connected to internet & located in a different place (for example in a different country) and work on it as if you are accessing your local network PC as in remote desktop connection(mstsc) ? Here is an exclusive software utility just for the same and more !!! Let me introduce you Team Viewer (one of the best available tool in this arena).

Team Viewer
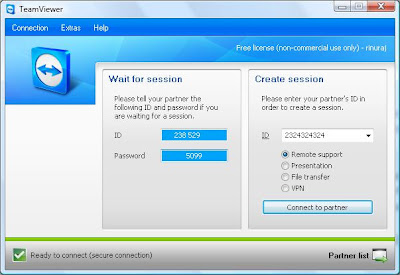
TeamViewer is a software package for remote control, desktop sharing and file transfer that works behind firewalls & NAT proxy. Just see the user interface of Team Viewer.


You can download it from here.

License
The personal-use or non-commercial use version is provided for free, while the business editions start at $249. The non-commercial use version of the software has limited features compared to the commercial version, and it is not licensed for use in a commercial environment. Extras which are provided additionally in the licensed version are the customization of the client module (QuickSupport) and the TV Manager, a database AddOn tool which allows the session logging for billing purposes. Below sections are based on the non-commercial use version.

Major Features
Following are the major features available in Team Viewer,
Remote Support
With this we can control our partner's computer. We can view the partner's machine, access his cursor and work on that machine.
Presentation
With this we can present our desktop to our partner.
File transfer
With this we can send/receive files to/from your partner
VPN
With this we can establish a Virtual Private Network connection with your partner's computer.

How to use?
Your and your partner's computer should have Team Viewer installed in their machine. For accessing your partner's remote computer,
1. Run the Team Viewer in both computers.
2. Enter the partner's ID in the ID box (Get the ID and Password that will be shown on starting Team Viewer from your partner).
3. Choose the option/feature you want to activate and press Connect to Partner button.
4. Now it will ask for the partner's Password, enter it and press Log On button.

After all with Team Viewer cross-platform work is possible between Windows and Macintosh systems !

Thursday, March 19, 2009

[VC++] Change cursor using SetClassLong()

You can use SetClassLong() function for changing/setting the cursor of your application. Here is how to do it.
SetClassLong( GetSafeHwnd(),
GCL_HCURSOR,
(LONG)LoadCursor(AfxGetInstanceHandle(),
MAKEINTRESOURCE( IDC_CURSOR1 )));
Please make sure that cursor resource IDC_CURSOR1 is created and available in the .rc file.

Wednesday, March 18, 2009

[VC++] Getting first item selected in CListCtrl

When you start to use CListCtrl, you may come in need of knowing the first selected index of a listcontrol. Here is how to find the same,
int nItemIdx = m_List.GetNextItem( -1, LVNI_SELECTED );
if( nItemIdx == -1 )
{
// No item selected
}
else
{
// nItemIdx holds the index of item selected
}

Sunday, March 8, 2009

[VC++] Showing restart dialog

Simplest way to show a restart dialog is to use the API RestartDialog(). See how to do it !
RestartDialog( NULL, NULL, EWX_REBOOT );
Please note that this function is available through Windows XP Service Pack 2 (SP2) and Windows Server 2003. It might be altered or unavailable in other versions of Windows.

Tuesday, March 3, 2009

[VC++] Finding logical drive letters using GetLogicalDriveStrings()

Below code demonstrates how to find the logical drive letters in your machine using API GetLogicalDriveStrings(). If executed the below code on finding each drive letter it will show a message box displaying the drive letter.
TCHAR tszDriveList[512];
TCHAR tszDrive [3*sizeof(TCHAR)];
// Get the logical drive strings
int nDriveStrLen = GetLogicalDriveStrings( sizeof( tszDriveList ), tszDriveList );
if( 0 != nDriveStrLen )
{
// Parse the returned multi-string array.
int nIdx = 0;
while( 0 != tszDriveList[nIdx])
{
_tcscpy( tszDrive, &(tszDriveList[nIdx]));
// Show the drive obtained
AfxMessageBox( tszDrive );
// Skipping index for getting the whole :\ with drive letter
while( 0 != tszDriveList[nIdx] )
{
nIdx++;
}
nIdx++;
}
}

[VC++] Finding executable filename for a document

You can find a document's executable file name and path using FindExecutable() API. For example if you want to know the executable file path of a *.doc file it will return winword.exe installed path. Below code demonstrate how to use this.
TCHAR wcsExecutablePath[MAX_PATH];
// Find Executable path of the document
if( 32 < (int)FindExecutable( _T( "C:\\Test.doc" ),// Document Name
NULL, // Current working directory
wcsExecutablePath )) // Executable path returned
{
// Show the executable path obtained
AfxMessageBox( wcsExecutablePath );
}

[VC++] Open file dialog using GetFileNameFromBrowse()

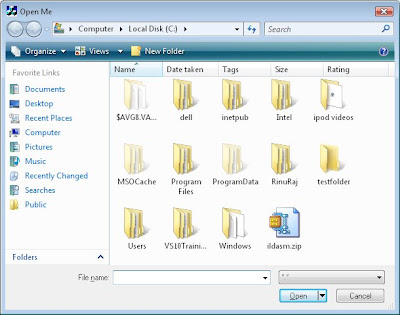
You may be familiar with the File Open Dialog in application such as notepad, do you know how to make the same ? Its simple with a shell API GetFileNameFromBrowse() which is a wrapper of GetOpenFileName(). See the below code and see the appearance of the File open dialog in vista,
wchar_t wszFilepath[MAX_PATH] = L"C:\\";

if( GetFileNameFromBrowse( GetSafeHwnd(),
wszFilepath, // Default File Path
MAX_PATH, // Size of file path
NULL, // Working Directory
NULL, // Default Extension
L"*.*", // Filters
L"Open Me" ))// Dialog Title
{
// Show user selected file name/path in a message box
MessageBox( CString( wszFilepath ));
}
See the File Open dialog shown on excuting the above code

[VC++] Getting Drive type using RealDriveType()

Do you want to know what type of a drive is corresponding an index, there is a shell function RealDriveType() which will help you figuring out the same. This function will take first parameter as the drive index, for example if you pass drive index 1 that corresponds to A: if you pass drive index 3 that corresponds to C: similarly it will go on. See the below function for demonstrating how to know the drive type. If you pass a drive index to this function then it will show message box displaying the drive type. For example if you pass 3 it will show message box saying "Fixed Drive".
void ShowDriveType( int nDriveIdx_i )
{
int nDriveType = RealDriveType( nDriveIdx_i, 0 );
switch( nDriveType )
{
case DRIVE_UNKNOWN:
// This is an unknown drive
AfxMessageBox( "Unknow drive type" );
break;
case DRIVE_NO_ROOT_DIR:
// This is an Invalid root path
AfxMessageBox( "Invalid root path" );
break;
case DRIVE_REMOVABLE:
// This is a Removable Drive
AfxMessageBox( "Removable Drive" );
break;
case DRIVE_FIXED:
// This is a fixed drive
AfxMessageBox( "Fixed Drive" );
break;
case DRIVE_REMOTE:
// This is a Network Drive
AfxMessageBox( "Network Drive" );
break;
case DRIVE_CDROM:
// This is a CD/DVD Drive
AfxMessageBox( "CD/DVD Drive" );
break;
case DRIVE_RAMDISK:
// This is a RAM disk drive
AfxMessageBox( "RAMDisk Drive" );
default:
break;
};
}