// Return Unique String ID each timeThis function uses CoCreateGuid() function which create an absolutely unique number that we can use as a persistent identifier. UuidToString () is used convert this Unique ID to a string. Do not forget to call RpcStringFree() for deallocating the memory if you are calling UuidToString (). You may need to include Rpc.h and link to Rpcrt4.lib for building the function.
const CString CreateUniquieID()
{
GUID UIDObj;
// Create Unique ID
CoCreateGuid( &UIDObj );
unsigned char* pUIDStr;
// Convert Unique ID to String
UuidToString( &UIDObj, &pUIDStr );
CString csUIDStr( pUIDStr );
// Free allocated string memory
RpcStringFree( &pUIDStr );
return csUIDStr;
}
Friday, February 27, 2009
[VC++] Creating Unique ID with CoCreateGuid()
At some point of a programmers life he will be in need to create some unique name. For example in one of my previous post for Preventing Multiple Instances I have suggested using a unique name for the mutex. Here is a utility function which will help you create a unique string.
Wednesday, February 25, 2009
[VC++] Extracting and using icon from other Applications
If you want to have your application using the icons of some other application in an easy way ExtractIcon() or ExtractIconEx() serves you the best. See the below code snippet demonstrating how to extract and use the icon of calculator as your application icon.
HICON hIcon;Do not forget to destroy the icon handle calling DestroyIcon(), when no longer needed.
// Extract icon of Windows Calculator
hIcon = ExtractIcon( AfxGetApp()->m_hInstance, "C:\\WINDOWS\\system32\\calc.exe", 0 );
// Set the extracted icon as the application's icon.
SetIcon( hIcon, FALSE );
[VC++] Hiding application button from Taskbar
If you do not want to show your application on Windows Taskbar while it is running, modify the CMainFrame::PreCreateWindow() by adding WS_EX_TOOLWINDOW style and removing WS_EX_APPWINDOW style to Create Structure. See the below code which will do the same.
BOOL CMainFrame::PreCreateWindow(CREATESTRUCT& cs)
{
 if( !CFrameWnd::PreCreateWindow(cs) )
  return FALSE;
    // Adding Tool window style
    cs.dwExStyle = WS_EX_TOOLWINDOW ;
    // Removing App window style
    cs.dwExStyle &= ~WS_EX_APPWINDOW ;
    return TRUE;
}
Tuesday, February 24, 2009
[VC++] Removing 'Untitled' from Doc/View App Titlebar
Most of you may get wearied of seeing the 'Untitled' caption on your title bar when you create a Document/View Architecture application, say SDI application. What we actually seeing on an SDI title bar is Document Name - Application name, by default your document name will be 'Untitled' and application name will be IDR_MAINFRAME's value in the string table. The reason why you are seeing this is because of a style set by default FWS_ADDTOTITLE to the CREATESTRUCT data structure. So inorder to remove the 'Untitled'(or document name) from your mainframe title bar, remove the FWS_ADDTOTITLE style from the create structure of the mainframe window. There is one more style which worth a mention at this point, FWS_PREFIXTITLE this is the one responsible showing the document name followed by the application name. If we remove this style and if FWS_ADDTOTITLE is not removed then window will show title as Application name - Document Name.
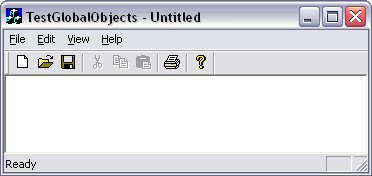
Suppose if my Application name is TestGlobalObjects then see the default title bar with Untitled.

Changing Document Prefix Title to Postfix
See the below code modification in CMainFrame::PreCreateWindow() removing the FWS_PREFIXTITLE and see the change in window title bar caption.
Suppose if my Application name is TestGlobalObjects then see the default title bar with Untitled.

Changing Document Prefix Title to Postfix
See the below code modification in CMainFrame::PreCreateWindow() removing the FWS_PREFIXTITLE and see the change in window title bar caption.
BOOL CMainFrame::PreCreateWindow(CREATESTRUCT& cs)
{
    if( !CFrameWnd::PreCreateWindow(cs) )
 return FALSE;

    // Removing Pre Fix style
    cs.style &= ~FWS_PREFIXTITLE;
    return TRUE;
}

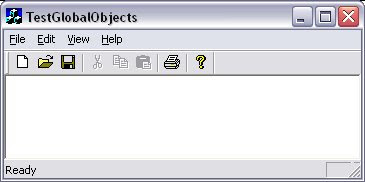
Removing document from title
See the below code and see the Untitled removed from window title bar on executing the below code.
BOOL CMainFrame::PreCreateWindow(CREATESTRUCT& cs)
{
   if( !CFrameWnd::PreCreateWindow(cs) )
  return FALSE;

    // Removing the Add To Title style
    cs.style &= ~FWS_ADDTOTITLE;
    return TRUE;
}

Monday, February 23, 2009
[VC++] Map or Unmap network drive
Are you looking for a standard 'Map Network Drive' dialog for mapping a network resource as a local drive to your Computer ? Or you may be looking for ‘Disconnect Network Drives' dialog box for disconnecting network resource mapped as your local drive ? Here is how to show such dialogs for mapping or disconnecting network resources using two APIs WNetConnectionDialog() and WNetDisconnectDialog(),
Showing 'Map Network Drive' dialog box


Showing 'Map Network Drive' dialog box
// Show Map Network Drive dialog
DWORD dwNetConnectRes = WNetConnectionDialog( 0, RESOURCETYPE_DISK );
if( NO_ERROR == dwNetConnectRes )
{
    // successfully mapped the drive
}
else if( -1 == dwNetConnectRes )
{
    // User canceled
}
else
{
    // Mapping network drive failed
}
Above code when executed will display the 'Map Network Drive' dialog as shown below. For mapping a network resource press the Browse... button and select the network resource and press Finish.

Showing 'Disconnect Network Drives' dialog box
// Show Disconnect Network Drives dialogSee the below Disconnect Drives dialog displayed in my machine(with two network resources mapped already) on executing the above code. To disconect just select and press OK button.
DWORD dwNetDisConnectRes = WNetDisconnectDialog( 0, RESOURCETYPE_DISK );
if( NO_ERROR == dwNetDisConnectRes )
{
// successfully unmapped the drive
}
else if( -1 == dwNetDisConnectRes )
{
// User canceled
}
else
{
// Disconnecting network drive failed
}

For availing the above APIs you may need to incude header file winnetwk.h and link to mpr.lib.
Sunday, February 22, 2009
[C/C++] Error tracing using __FILE__ and __LINE__
You might have seen the preprocessor directives __FILE__ and __LINE__. I shall explain how to use the same for error reporting in your application.
__FILE__ This macro holds the file name of the current execution context.
__LINE__ This macro holds the line number of the current source file's execution context.
With these macros you can make your error reporting more effective by specifying the file name and line number where error was occurred. This will help to troubleshoot the issue more effectively and easily. Following is a utility function which you can use to log error message to debug viewer.
// For converting integer line number to stringYou can call the above utility function as shown below, if some error occur. Use the Debug Viewer for viewing the output.
#define STR(X) #X
#define MAKE_STR(X) STR(X)
// For holding the file name & line number of error context
#define FILE_INFO __FILE__ ":" MAKE_STR( __LINE__ )
// Log the error message with file name and line no to debugview
void TraceError( const char* pcErrorLoc, const char* pcErrorMsg )
{
char szErrorMsg[MAX_PATH];
// Format msg to "Error at <filepath>:<line> - <message>"
sprintf( szErrorMsg, "Error at %s - %s", pcErrorLoc, pcErrorMsg );
OutputDebugString( szErrorMsg );
}
// Call the function if error occured
TraceError( FILE_INFO, "Invalid input from the user" );
[VC++] Process Information with ZwQueryInformationProcess()
There is an undocumented native ZwQueryInformationProcess() API available in NTDLL.dll, with which we can get the process information such as process id, base priority, parent process id, affinity mask etc. Below code snippet shows how to use the same,
typedef structIn my previous post I have shown you how to get the parent process id by iterating through the processes and in the above code stProcessBasicInformation.pulInheritedFromUniqueProcessId represents the parent process id.
{
ULONG ulExitStatus;
PVOID pBaseAddress;
ULONG ulAffinityMask;
ULONG uBasePriority;
ULONG_PTR pulUniqueProcessId;
ULONG_PTR pulInheritedFromUniqueProcessId;
} PROCESS_BASIC_INFORMATION;
typedef ULONG (WINAPI * ZwQueryInformationProcess)( HANDLE ProcessHandle,
ULONG ProcessInformationClass,
PVOID ProcessInformation,
ULONG ProcessInformationLength,
PULONG ReturnLength );
// Load NTDLL
HMODULE hModule = LoadLibrary( "NTDLL.dll" );
// Get the ZwQueryInformationProcess() address
ZwQueryInformationProcess ZwQueryInformationProcessPtr = (ZwQueryInformationProcess)GetProcAddress( hModule, "ZwQueryInformationProcess");
PROCESS_BASIC_INFORMATION stProcessBasicInformation = { 0 };
if( ZwQueryInformationProcessPtr )
{
// Get the process handle
HANDLE hProcess = OpenProcess( PROCESS_ALL_ACCESS, FALSE, GetCurrentProcessId());
// Call the function
ZwQueryInformationProcessPtr(hProcess, 0, &stProcessBasicInformation, sizeof(stProcessBasicInformation), 0);
}
FreeLibrary( hModule );
[VC++] Getting parent Process ID of current process
If you need to get the Process ID of your parent application, after taking a snapshot of all the process you may need to iterate and get the current process information. See the below code snippet for obtaining the parent Process ID.
HANDLE hSnapShot = CreateToolhelp32Snapshot( TH32CS_SNAPPROCESS, 0 );There is an alternate way for getting parent process id using an undocumented API ZwQueryInformationProcess()
PROCESSENTRY32 stProcessEntry;
// Get the current process id
DWORD dwPID= GetCurrentProcessId();
// To store Parent process id
DWORD dwParentPID = 0;
// Get the first process
BOOL bContinue = Process32First( hSnapShot, &stProcessEntry );
// Loop for all the process
while( bContinue )
{
// If current process get the parent id
if( dwPID == stProcessEntry.th32ProcessID)
{
// Now dwParentPID have the parent process id
dwParentPID = stProcessEntry.th32ParentProcessID;
break;
}
// If not current process Get next process
bContinue = Process32Next( hSnapShot, &stProcessEntry );
}
// Show the parent Process ID
char szParentPID[5];
itoa( dwParentPID, szParentPID, 10 );
MessageBox( szParentPID );
Saturday, February 21, 2009
[VC++] Programmatically empty the Recycle Bin
Suppose in your program if you are in need of more disk space very first thing you can do is empty the recycle bin. There is a shell function SHEmptyRecycleBin() for emptying the recycle bin. Please see the below code snippet showing the usage.
// Empty Recycle bin.You can specify options such as do not show delete progress and do not make sounds specifying respective flags in the last parameter of the function. Specifying drive or folder path as the second parameter will remove only content deleted from those folders.
if( S_OK == SHEmptyRecycleBin( NULL,
NULL,
SHERB_NOCONFIRMATION ))
{
// Successfully emptied
}
Friday, February 20, 2009
[VC++] Enabling XP style theme in Win32/MFC App
You might have noticed that your application developed in VC6, XP style themes are not enabled. If you want your application to use visual styles, you must add an application manifest that indicates that ComCtl32.dll version 6 should be used if it is available. If you are looking for adding XP visual styles you have two options to deal with, you can either add a manifest file to the path of your executable or you can embed the manifest content to your executable. See how to do the same in each option.
Adding Manifest file method
Adding Manifest file method
- Create a text file with name YourAppName.exe.manifest in your executable path. For eg: if your executable's name is TestApp.exe manifest file's name will be TestApp.exe.manifest
- Paste the below code to the manifest file you created. Replace CompanyName.ProductName.YourApp and Your application description here with your application details in the manifest file.
- Now you can run your application and feel the difference !
<?xml version="1.0" encoding="UTF-8" standalone="yes"?>Embeding manifest in your executable
<assembly
xmlns="urn:schemas-microsoft-com:asm.v1"
manifestVersion="1.0">
<assemblyIdentity
version="1.0.0.0"
processorArchitecture="X86"
name="CompanyName.ProductName.YourApp"
type="win32" />
<description>Your application description here.</description>
<dependency>
<dependentAssembly>
<assemblyIdentity
type="win32"
name="Microsoft.Windows.Common-Controls"
version="6.0.0.0"
processorArchitecture="X86"
publicKeyToken="6595b64144ccf1df"
language="*" />
</dependentAssembly>
</dependency>
</assembly>
- Take Workspace window->Resource tab of your Visual Studio IDE
- Right click on the resources and choose insert , then Insert Resource dialog will be shown.
- Select Custom... button of the Insert Resource dialog and enter the custom resource type as 24 and press OK.
- Copy and paste the above shown manifest file after specific modifications (mentioned in the previous method)
- Change the Resource ID of the newly added IDR_DEFAULT1 to 1
- Call InitCommonControls() (include commctrl.h and link comctl32.lib)from any of your init function such as InitInstace() or Winmain()
- Rebuild the application, everything is embedded in your application. Execute it and feel the XP style.
[VC++] Changing your screen resolution programmatically
Here is how to change your screen resolution programmatically. For doing this you may need the assistance of two APIs,
- EnumDisplaySettings() - for getting the current graphics mode.
- ChangeDisplaySettings() - for setting the modified graphic mode.
DEVMODE stGraphicsMode;
// Retrieves the information of current display device
EnumDisplaySettings ( NULL, 0, &stGraphicsMode );
// Change the screen resolution
stGraphicsMode.dmPelsWidth  = 1280;
stGraphicsMode.dmPelsHeight = 1024;
stGraphicsMode.dmBitsPerPel = 32;
// Set the modifying items
stGraphicsMode.dmFields = DM_PELSWIDTH  DM_PELSHEIGHT  DM_BITSPERPEL;
// Change the display settings
if( DISP_CHANGE_SUCCESSFUL == ChangeDisplaySettings( &stGraphicsMode, CDS_FULLSCREEN ))
{
    //Successfully changed!
}
Thursday, February 19, 2009
[VC++] Checking your window is visible to the user ?
Are you interested in knowing programmatically, that your application's windows are visible or not ? You might be familiar with IsWindowVisible(), but this function won't give you the right answer to identify whether your window is partially shown or some other window is over your window or so. It is possible to check the window visiblity by clipping the window with GetClipBox(); below function demonstrate the same, what you have to do is call the below function passing handle to the window and check the return value visibile, partial visible or hidden.
// Enumeration for return values
enum VISIBLE_STATS_e
{
    WND_ERROR = -1,          // Failed getting visiblity
    WND_HIDDEN = 0,          // Window is hidden
    WND_PARTIAL_VISIBLE = 1, // Window is partially shown
    WND_FULL_VISIBLE = 2     // Window is fully shown
};

// Utility function which will return depending the windows current status
VISIBLE_STATS_e GetWindowVisibleStatus( HWND hWnd_i )
{
    VISIBLE_STATS_e eRetStatus = WND_ERROR;
    if( IsWindow( hWnd_i ))
    {
        CRect ClientRect;
        CRect ClipRect;
        HDC hWndDC = GetDC( hWnd_i );
        // Get the Window associated to the client rectangle
        GetClientRect( hWnd_i, &ClientRect );
        // Get the clipping rect of window
        switch ( GetClipBox( hWndDC, &ClipRect ))
        {
        case NULLREGION:
            eRetStatus = WND_HIDDEN;
            break;
        case COMPLEXREGION:
            eRetStatus = WND_PARTIAL_VISIBLE;
            break;
        case SIMPLEREGION:
            // If client area is visible then treat it as visible
            if( EqualRect( &ClipRect, &ClientRect ))
            {
                eRetStatus = WND_FULL_VISIBLE;
            }
            else
            {
                eRetStatus = WND_PARTIAL_VISIBLE;
            }
            break;
        default:
            eRetStatus = WND_ERROR;
            break;
        }
        ReleaseDC( hWnd_i, hWndDC );
    }
    return eRetStatus;
}
Wednesday, February 18, 2009
Syntax Highlighter in blogger for source code publishing
If you are new to blogger and you may not be happy with your source code snippets' appearance when published. I have faced the similar issue and here I shall explain how easy to solve it. I am now using Syntax Highlighter for source code publishing in my blog for code highlighting. For a sample please see how this post looks with source code highlighted. Once you implement source code highlighting with Syntax Highlighter viewers or readers can see your code with a pretty cool look, then they have options like view plain code, print code etc. So start making your code snippets in blogger attractive with Syntax Highlighter, here are the steps
- Step 1: You may need to download and host Syntax Highlighter's .js scripts to some where at web and make it accessible. If you dont have an option to host over web you can use mine(shown in the step 3).
- Step 2: Log in to blogger and take Layout. Select Edit HTML in the Layout tab now you can see Edit Template with html of your template.
- Step 3: In the Edit Template search for /head and add the below code just before the /head. If you have hosted syntax highlighter scripts to some page you can use that address instead of mine.
<link href='http://rinuraj4u.googlepages.com/SyntaxHighlighter.css' rel='stylesheet' type='text/css'>
<script language='javascript' src='http://rinuraj4u.googlepages.com/shCore.js'>
<script language='javascript' src='http://rinuraj4u.googlepages.com/shBrushCSharp.js'>
<script language='javascript' src='http://rinuraj4u.googlepages.com/shBrushPhp.js'>
<script language='javascript' src='http://rinuraj4u.googlepages.com/shBrushJScript.js'>
<script language='javascript' src='http://rinuraj4u.googlepages.com/shBrushJava.js'>
<script language='javascript' src='http://rinuraj4u.googlepages.com/shBrushVb.js'>
<script language='javascript' src='http://rinuraj4u.googlepages.com/shBrushSql.js'>
<script language='javascript' src='http://rinuraj4u.googlepages.com/shBrushXml.js'>
<script language='javascript' src='http://rinuraj4u.googlepages.com/shBrushDelphi.js'>
<script language='javascript' src='http://rinuraj4u.googlepages.com/shBrushPython.js'>
<script language='javascript' src='http://rinuraj4u.googlepages.com/shBrushRuby.js'>
<script language='javascript' src='http://rinuraj4u.googlepages.com/shBrushCss.js'>
<script language='javascript' src='http://rinuraj4u.googlepages.com/shBrushCpp.js'>
- Step 4: Now search for /html tag in the Edit Template and add the below code just before the /html tag.
<script language='javascript'>
dp.SyntaxHighlighter.BloggerMode();
dp.SyntaxHighlighter.HighlightAll('code');
</script>
- Step 5: Save your template now.
- Step 6: Now for highlighting your code snipetts, take Edit Html of your posts and embed code with in suitable tags given below,
<pre name="code" class="Cpp">For a list of supported languages and class names to be used for syntax highlighter see here.
... some code here ...
</pre>
[VC++] Accessing taskbar from your program & do operations
Are you interested in accessing windows taskbar and its child programs in your program? It's an easy thing; you may know that "Shell_TrayWnd" is the class name of the windows taskbar. You can use FindWindow() for obtaining handle to taskbar and you can get its child windows by using EnumChildWindows() or by explicitly get the window handle specifying the class name in FindWindowEx(). I shall demonstrate how to show/hide taskbar and its child windows programmatically.
Show/Hide Windows Taskbar
Show/Hide Windows Taskbar
// Get the task bar windowShow/Hide System tray child window
HWND hSysTrayWnd = ::FindWindow( "Shell_TrayWnd", 0 );
// Toggle the show or hidden status
if( ::IsWindowVisible( hSysTrayWnd ))
{
::ShowWindow( hSysTrayWnd, SW_HIDE );
}
else
{
::ShowWindow( hSysTrayWnd, SW_SHOW );
}
// Get the shell tray windowShow/Hide System Clock
HWND hSysTrayWnd = ::FindWindow ("Shell_TrayWnd", 0 );
if( hSysTrayWnd )
{
// Get the tray notification window
HWND hTrayNotifyWnd = ::FindWindowEx( hSysTrayWnd, 0, "TrayNotifyWnd", 0 );
if( hTrayNotifyWnd )
{
// Hide the tray notification window if shown or show if hidden
if( ::IsWindowVisible( hTrayNotifyWnd ))
{
::ShowWindow( hTrayNotifyWnd, SW_HIDE );
}
else
{
::ShowWindow( hTrayNotifyWnd, SW_SHOW );
}
}
}
// Get the shell tray windowShow/Hide Start button
HWND hSysTrayWnd = ::FindWindow( "Shell_TrayWnd", 0 );
if( hSysTrayWnd )
{
// Get the tray notification window
HWND hTrayNotifyWnd = ::FindWindowEx( hSysTrayWnd, 0, "TrayNotifyWnd", 0 );
if( hTrayNotifyWnd )
{
// Get the tray clock window
HWND hTrayClockWnd = ::FindWindowEx( hTrayNotifyWnd, 0, "TrayClockWClass", 0);
if( hTrayClockWnd )
{
// Hide the tray clock if shown or show if hidden
if( ::IsWindowVisible( hTrayClockWnd ))
{
::ShowWindow( hTrayClockWnd, SW_HIDE );
}
else
{
::ShowWindow( hTrayClockWnd, SW_SHOW );
}
}
}
}
// Get the shell tray window
HWND hSysTrayWnd = ::FindWindow( "Shell_TrayWnd", 0 );
if( hSysTrayWnd )
{
    // Get the start button
    HWND hStartBtn = ::FindWindowEx( hSysTrayWnd, 0, "Button", "start" );
    if( hStartBtn )
    {
        // Hide the start button if shown or show if hidden
        if( ::IsWindowVisible( hStartBtn ))
        {
            ::ShowWindow( hStartBtn, SW_HIDE );
        }
        else
        {
            ::ShowWindow( hStartBtn, SW_SHOW );
        }
    }
}
[VC++] Programmatically starting/stoping screensaver
For starting windows screen saver send WM_SYSCOMMAND message to your own window with parameter SC_SCREENSAVE
For stopping windows screen saver - use SystemParametersInfo() for knowing whether screen saver is running or not and if running close the foreground window.
PostMessage( WM_SYSCOMMAND, SC_SCREENSAVE );
For stopping windows screen saver - use SystemParametersInfo() for knowing whether screen saver is running or not and if running close the foreground window.
if( ::SystemParametersInfo( SPI_GETSCREENSAVERRUNNING,0,&bSaver,0 ))
{
    if( bSaver )
    {
      ::PostMessage (::GetForegroundWindow(), WM_CLOSE, 0L, 0L);
    }
}
Tuesday, February 17, 2009
[VC++] Adding icon to system tray
Here is how to create a tray icon for your application and showing system tray menu. For this you need to add an icon to the system tray using Shell_NotifyIcon() and you need to handle the tray message for the added icon. Below is the code for adding tray icon and showing a menu saying Test Tray Icon on clicking the tray icon.
Modify dialog class header creating a member variable for system tray menu and adding declaration of shell tray icon message handler.
Modify dialog class Cpp file adding global constants for tray icon message handling and tray icon id
Modify dialog class Cpp file adding tray icon adding code in OnInitdialog
Add entry to message map for mapping tray icon message
Now implement the tray icon message handler which will handle mouse LButton and RButton down by showing a menu
Modify dialog class header creating a member variable for system tray menu and adding declaration of shell tray icon message handler.
protected:
...
afx_msg HRESULT OnSystemTrayIconClick( WPARAM wParam_i, LPARAM lParam_i );

private:
...
CMenu m_TrayMenu;
Modify dialog class Cpp file adding global constants for tray icon message handling and tray icon id
const UINT SHELL_TRAY_ICON = 2001; // Shell Tray icon ID
const UINT SHELL_TRAY_MSG = (WM_APP+2000); // Message name for tray icon messages
const UINT SHELL_TRAY_TEST_ID = 2100; // ID of shell tray menuitem
Modify dialog class Cpp file adding tray icon adding code in OnInitdialog
void CSampleDlg::OnInitDialog()
{
    ...
    NOTIFYICONDATA stNotifyIconData;
    stNotifyIconData.cbSize = sizeof( NOTIFYICONDATA );
    stNotifyIconData.hWnd = GetSafeHwnd();
    stNotifyIconData.uID = SHELL_TRAY_ICON;
    stNotifyIconData.uFlags = NIF_MESSAGE  NIF_ICON  NIF_TIP;
    stNotifyIconData.uCallbackMessage = SHELL_TRAY_MSG;
    stNotifyIconData.hIcon = AfxGetApp()->LoadIcon( IDR_MAINFRAME );
    strncpy( stNotifyIconData.szTip, "TestShellTrayIcon",sizeof"TestShellTrayIcon"));
    Shell_NotifyIcon( NIM_ADD, &stNotifyIconData );
    m_TrayMenu.CreatePopupMenu();
    m_TrayMenu.InsertMenu( 0, MF_BYCOMMAND|MF_POPUP,SHELL_TRAY_TEST_ID, "Test Tray Icon" );
    return TRUE;
}
Add entry to message map for mapping tray icon message
BEGIN_MESSAGE_MAP( CSampleDlg, CDialog )
...
ON_MESSAGE ( SHELL_TRAY_MSG, OnSystemTrayIconClick )
END_MESSAGE_MAP()
Now implement the tray icon message handler which will handle mouse LButton and RButton down by showing a menu
HRESULT CSampleDlg::OnSystemTrayIconClick( WPARAM wParam_i, LPARAM lParam_i )
{
    switch( wParam_i )
    {
    case SHELL_TRAY_ICON:
        {
            switch( lParam_i )
            {
            case WM_LBUTTONDOWN:
            case WM_RBUTTONDOWN:
                {
                    POINT CurPos ;
                    GetCursorPos( &CurPos );
                    SetForegroundWindow();
                    TrackPopupMenu( m_TrayMenu, TPM_LEFTBUTTON, CurPos.x, CurPos.y, 0, GetSafeHwnd(), 0 );
                    PostMessage( WM_NULL, 0, 0 );
                }
                break ;
            }
        }
        break ;
    default:
            OutputDebugString ("invalid icon id from tray\n");
            break ;
    }
    return TRUE ;
}
Monday, February 16, 2009
[VC++] Getting process name from Process ID
It is easy to obtain the process name from a Process ID.
- Open the process with Process ID using OpenProcess()
- Enumerate the loaded modules using EnumProcessModules()
- Take the first module handle retrieved in the previous step and get the module name using GetModuleBaseName()
See the below code executing the above steps and how to obtain the process name using PID.
HANDLE hProcess = OpenProcess( PROCESS_QUERY_INFORMATION|PROCESS_VM_READ,Include psapi.h and link psap.lib for getting these APIs. Above program when slightly modified can be used to obtain all the loaded modules by the process, for this you need to specify a HMODULE array to EnumProcessModules() and loop GetModuleBaseName() for each item of the HMODULE obtained.
FALSE, dwPID_i );
if( hProcess )
{
char szProcessName[MAX_PATH];
HMODULE hMod;
DWORD dwNeeded;
if( EnumProcessModules( hProcess,
&hMod,
sizeof(HMODULE),
&dwNeeded ))
{
if( GetModuleBaseName( hProcess,
hMod,
szProcessName,
sizeof( szProcessName )))
{
// Show the process name
MessageBox( szProcessName );
}
}
CloseHandle( hProcess );
}
Friday, February 13, 2009
[VC++] Programmatically Show/Hide Desktop contents
Below code snippet shows how to hide desktop content. Idea is simple find the Program Manager window and then get its child list view which host the desktop icons and hide it.
HWND hProgmMngrWnd, hDefViewWnd, hIconViewWnd;
hProgmMngrWnd = (FindWindow ("Progman", "Program Manager"))->GetSafeHwnd();
hDefViewWnd = FindWindowEx( hProgmMngrWnd, NULL, "SHELLDLL_DefView", NULL);
hIconViewWnd = FindWindowEx( hDefViewWnd, NULL, "SysListView32",NULL);
::ShowWindow( hIconViewWnd, SW_HIDE );
For programmaticaly showing the desktop icons replace the last line of the above code block with the below line of code(to show the window, instead of hiding).
::ShowWindow( hIconViewWnd, SW_SHOW );
[C/C++] Environment variables as argument to main()
Most of us may not have noticed that main() supports a third argument which will provide you an array of pointers to environment variable strings. See the below code,

int main( int nArgc, char* pcArgv[], char* pcenv[ ])
{
    int nIdx = 0;
    while ( pcenv[ nIdx ] )
      printf ( "%s\n", pcenv[ nIdx++ ] );
    return 0;
}
The above program will print all the environment variables in the console window
Thursday, February 12, 2009
[VC++] You should know this !
Here is a set of things that you should know about your application,
- Returning 0 from InitInstance( ) will close your application.
- m_pMainWnd which contains address of your application main window is a public data member of CWinApp class. AfxGetMainWnd( ) function returns the address stored in m_pMainWnd i.e. address of frame window.
- AfxGetApp( ) returns address of your application object. So AfxGetApp( ) can be used to call member functions or access public data members of CWinApp class.
- Set WS_VISIBLE style in Create( ) function then no need to call ShowWindow( ).
- MAKEINTRESOURCE macro (declared in 'windows.h') converts an integer to string.
- Selecting 'Use MFC in static DLL' (from Project->Settings->General) will create a standalone EXE but the size of your EXE will be much large.
- Functions with a prefix 'Afx' are global function which can be accessed from anywhere.
[VC++] Programmatically displaying properties dialog
Here is how to display the properties dialog programmatically.
SHELLEXECUTEINFO shExecuteInfo = { 0 } ;
shExecuteInfo.cbSize = sizeof ( shExecuteInfo ) ;
shExecuteInfo.fMask = SEE_MASK_INVOKEIDLIST ;
shExecuteInfo.lpVerb = "properties" ;
shExecuteInfo.lpFile = "C:\\WINDOWS\\system32\\notepad.exe" ;
ShellExecuteEx ( &shExecuteInfo ) ;
Above code when executed will display the properties dialog box of notepad(as shown below). Similarly we can display any folder or file properties by giving its path name to SHELLEXECUTEINFO::lpFile.

[VC++] Extracting Red, Green, Blue values from a RGB value without using API functions
I will show you how to extract the Red, Green and Blue values from a COLORREF object. See the below code it is self explanatory.
COLORREF TestClr = RGB ( 100, 150, 50 ) ;
int nR, nG, nB ;
// Get Red value
nR = (( TestClr ) & 0xFF );
// Get Green value
nG = ((( TestClr ) >> 8 ) & 0xFF );
// Get Blue value
nB = ((( TestClr ) >> 16 ) & 0xFF );
CString csRGBVal;
csRGBVal.Format( "R = %d G = %d B = %d", nR, nG, nB );
MessageBox( csRGBVal, "RGB values" );
If the above code is executed below output message box will be shown.

Wednesday, February 11, 2009
[VC++] Source browsing in VC6
Source Browsing is the feature that help us to navigate/understand a large code base through the References & Definitions, File outlines etc. Here is how to do Source Browsing in VC6,
- Select the symbol or identifier in the Visual Studio Editor and press Alt + F12.
- If you built your application without Browse information then it will show a warning message box for you to rebuild project with browser information, Choose Yes this will build a *.bsc file at your executable's path !
- Now it will be provided with a dialog for choosing which query you need to get on the selected identifier(see below).

- Definitions and References Indicates where symbols are defined and referenced.
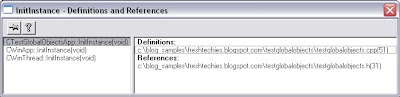
File Outline Displays all user-defined functions, classes, data, macros, and types.
- Base Classes and Members Displays all classes from which the selected class inherits attributes.

- Derived Classes and Members Displays all classes that inherit attributes from the selected class.

- Call Graph Displays relationships among all the functions that the selected function calls.
- Callers Graph Displays relationships among all the functions that call the selected function.


Monday, February 9, 2009
[VC++] Auto indent the current selection in Visual Studio Editor
If your program statements are not aligned properly and you want to have your whole function or block of statements to indent properly, here is an easy way to do the same
- Select the statements you want to align in the Visual Studio Editor.
- Now press Alt+F8 then the code will be automatically adjusted so that each line is at the correct indentation level.
[VC++] Fixing intellisense not working
Some time you will find that Visual Studio intellisense not working properly or not working at all. To solve this issue,
- Exit the Visual Studio.
- Delete the *.ncb file of your project.
- Now start the Visual Studio and open your project, the problem will be fixed.
[VC++] Fixing class browser & classwizard not displaying a class VC6
If Class Browser and Class Wizard do not display a class or so, then you need to recreate .clw file so that the issue will be solved! Here are the steps to do, 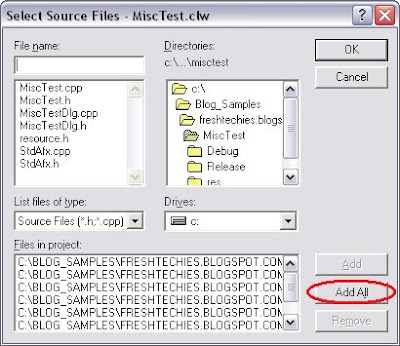
- Delete *.clw file from the project folder.
- Press Ctrl+W or take View->ClassWizard.. menu from IDE
- A confirmation message box will appear to create the classwizard database *.clw file, choose Yes.
- Now Select source files dialog will be shown(snapshot is shown below), press Add All button and then OK button.
- Now Classwizard will be shown with all the classes displayed.

Sunday, February 8, 2009
[VC++] Getting your application's module name
You can get your application module name through any of the below ways,
Using CWinApp::m_pszExeName
// This will return the application name (applicable for MFC application only)
AfxGetApp()->m_pszExeName;
Using GetModuleFileName()
char szAppPath[MAX_PATH] = "";
CString csAppName;// Assuming CString is supported else use std::string or so
::GetModuleFileName(0, szAppPath, MAX_PATH);
// Extract application name
csAppName = szAppPath;
csAppName = csAppName.Mid(csAppName.ReverseFind('\\') + 1);
[VC++] Showing all messages in ClassWizard VC 6
Some time you have observed that some of the available messages are not displayed in classwizard list, this is because based on the class type some default filter is applied. To show all the messages do the following,
- Take Classwizard and select Class Info tab.
- From Message filter combo box, choose Window.
- Now go back to Message Maps tab and all available messages are displayed in the Messages list.
[VC++] Visual Studio Debugger tips for viewing string pointers
If you add a string pointer to debug watch window what you can see is the memory location pointed and not the string itself. In order to view the string data we may need to place format specifier with the variable name in watch window.
Add following with variable name in watch window
,s for an simple null-terminated string
,s8 for a UTF-8 string
,su for a Unicode string
The memory operators can be used to display up to 64 bytes of memory in the preview line, as bytes, words, dwords, quads, or ascii characters
,mb bytes
,mw words
,md dwords
,mq quads
,ma ASCII
Also we can use ,wc ,wm and ,hr to view data as a window class, window message, and HRESULT respectively. See the below snapshot demonstrating how to use these operators in watch window.

For viewing UNICODE string in the watch/quick watch you can either ,su (I specified before) or can check the Display unicode strings check box in the Tools->Options->Debug tab
[VC++] Visual Studio Debugger tips for watch window
Displaying GetLastError's value and message in watch window
While debugging it is possible to get the GetLastError() returned after any line of execution and the message associated with it. For viewing the error code and error message in watch window what you need to do is add @err,hr to your watch window and see the value/message displayed on executing program statements.
Displaying pointer as an array in watch window
Suppose you have a pointer array and if you add the same to watch window, by default, you can view only the first value pointed. For viewing all the pointer array content, add the variable name to watch window and add the maximum index to be displayed separated by comma, for eg: watching pnValArr,100 will display all the value of pnValArr from 0 to 100th index. Similarly we can watch intermidate range of a pointer array, for eg: (pnValArr+90),10 will display content of pointer array from index 90 to 100.
See the below debug snapshot showing watch window demonstrating GetLastError() and displaying pointers as array

[VC++] Custom Tip of the day VC6
You should have seen the custom tip of the day when you start Microsoft Visual Studio, do you know from where it is displaying the same ? Please check the MSDEV INSTALL DIRECTORY\Common\MSDev98\Bin folder of files with extension .TIP (MSDEV.TIP, TOOLS.TIP, VCXX.TIP). Check the available tips and please note that you can add your own tips in to any .TIP file (follow the format of entries as in microsoft tip files) !
[VC++] Syntax highlighting for user defined keywords VC6
Do you want to highlight your user defined keywords in the Visual Studio editor ?
- Go to MSDEV INSTALL DIRECTORY\Common\MSDev98\Bin and create a new file named usertype.dat
- Add the user defined keyword(s) you want to get highlighted in the file(add one keyword per line)
- Restart visual studio and you can find that user defined keywords added in usertype.dat will be highlighted as default keywords.
[VC++] Build time in Visual Studio 6 with /Y3 command line
Here is how to obtain the build time in the Output window with Visual Studio 6.
You need to start MSDEV.exe with command line /Y3, for this you have 2 options,
You need to start MSDEV.exe with command line /Y3, for this you have 2 options,
- Starting MSDEV from command prompt with /Y3 option
- Better way is to create a shortcut of MSDEV and modify the target adding /Y3 (see below snapshots) and start Visual Studio from this shortcut.

Here is a sample build output with /Y3 switch

Thursday, February 5, 2009
[VC++] Visual Studio Debugger tips for viewing integer data
Visual Studio's C++ debugger has some undocumented yet powerful features ! Here is how to view an integer data type with its data in various ways. Suppose you break at the below statement in program,

int nVal = 0x12345678;
Use operators before variable name in watch window...
by To view contents of a variable as an unsigned byte
wo To view contents of a variable as an unsigned word
dw To view contents of a variable as a dword
Use format specifiers after variable name in watch window...
,o To view the conten in octal
,d To view the conten in decimal
,x To view the conten in hex
See the below debugging snapshot to visualize how to use the above said,

Wednesday, February 4, 2009
[VC++] Copying resource(.rc) content from one project to other
If you want to copy the content of one .rc file to another .rc file how you can do (for eg: copying one dialog from one project to another) ?
Traditional approach is to compare two .rc files (in text mode), then copy paste the needed lines. Also add corresponding resource id to resource.h with proper values. Care should be taken not to have same resource id or values. This is an erroneous undertaking right ? So do not go for this what is next ?
- Open your project in VC++ .
- Take File->Open & browse for the .rc file from which you want to copy.
- Open the .rc file specifying Open as Auto.
- Now you can see choosen .rc file open as in resource view (see below snapshot).
- Select the dialog (or dialog controls such as buttons ) and press Ctrl+C to copy.
- Now select the Workspace->Resource view and paste by pressing Ctrl+V. For eg: If you copied a dialog then select the dialog of Resource view and press Ctrl+V, if you copied some button controls click and open the dialog you want to paste it and press Ctrl+V.
- You can also drag and drop resource, in such a case take care not to save the source .rc file.

Then it is done ! All the .rc file updation, resource.h updation done automatically !!!
Tuesday, February 3, 2009
[VC++] PathIsDirectory() PathIsDirectoryEmpty() PathIsExe() and more...
Let me call your attention to some interesting functions available for ease your job while handling various file/directory paths.
PathIsDirectory()
As the name suggest it will check given path is a directory or not (and return TRUE or FALSE respectively). See the below sample code,
As the name suggest it will check whether the given directory path is empty.
As the name suggest it will check whether the given path is a path to any of .cmd, .bat, .pif, .scf, .exe, .com, or .scrfile
PathIsContentType()
PathIsFileSpec()
PathIsHTMLFile()
PathIsLFNFileSpec()
PathIsNetworkPath()
PathIsPrefix()
PathIsRelative()
PathIsRoot()
PathIsSameRoot()
PathIsSlow()
PathIsSystemFolder()
PathIsUNC ()
PathIsUNCServer()
PathIsUNCServerShare()
PathIsURL()
PathIsDirectory()
As the name suggest it will check given path is a directory or not (and return TRUE or FALSE respectively). See the below sample code,
    if( PathIsDirectory( "C:\\Windows" ))
    {
        // Yes given path is a directory
    }
    else
    {
        // Not a directory
}PathIsDirectoryEmpty()As the name suggest it will check whether the given directory path is empty.
    if( PathIsDirectoryEmpty( "C:\\temp" ))
    {
        // Yes given directory is empty
    }
    else
    {
        // Not an empty directory
}PathIsExe()As the name suggest it will check whether the given path is a path to any of .cmd, .bat, .pif, .scf, .exe, .com, or .scrfile
    if( PathIsExe( L"C:\\WINDOWS\\system32\\autochk.exe" ))
    {
        // Yes given path is an executable file
    }
    else
    {
        // Not an executable file
    }
There are more similar functions available please refer MSDN if needed,PathIsContentType()
PathIsFileSpec()
PathIsHTMLFile()
PathIsLFNFileSpec()
PathIsNetworkPath()
PathIsPrefix()
PathIsRelative()
PathIsRoot()
PathIsSameRoot()
PathIsSlow()
PathIsSystemFolder()
PathIsUNC ()
PathIsUNCServer()
PathIsUNCServerShare()
PathIsURL()
[C/C++] Charizing Operator (#@)
#@ is charizing operator has its application when used with arguments of macros. If #@ precedes a formal parameter in the definition of the macro, the actual argument is enclosed in single quotation marks and treated as a character when the macro is expanded. Check the below code and output,
Code:
Code:
    #define MAKE_CHAR(X)  #@X
    char cVal;
    cVal = MAKE_CHAR( R );
    MessageBox( CString(cVal),"Charizing Test" );
Output message box: 

[VC++] Programmatically locking your machine
For locking your machine programmatically you can use the API LockWorkStation(). See the below code for locking a system.
if( !LockWorkStation())
{
// Failed to lock the machine
}
Please note that _WIN32_WINNT should be defined >= 0x0500
if( !LockWorkStation())
{
// Failed to lock the machine
}
Please note that _WIN32_WINNT should be defined >= 0x0500
Monday, February 2, 2009
[VC++] Performance Tuning with Visual Studio Profiler (VC 6)
Performance tuning is analyzing and improving your application's performance. Visual studio provides a built in profiler for analyzing the performance (you can have a detailed list of time each function takes, hit counts etc so that you can figure out where is the performance bottle neck). Below is a brief overview of how to profile using VC 6 profiler.
Build your project for profiling
For function profiling

See more profiling tips here.
Build your project for profiling
For function profiling
- In the Visual Studio IDE take Project->Settings and it will display the Project Settings dialog box.
- Select the Link tab of Project Settings dialog box.
- Choose General in the Category drop-down list box.
- Check Enable Profiling check box and press OK button.
- Now build the project.
- Enable the function profiling as explained above.
- In the Link tab select the Generate Debug Info check box.
- Select the C/C++ tab and select the category drop-down list box as General.
- In the Debug Info drop-down list box, choose Program Database or Line Numbers Only.
- Click OK and re-build the project
Choose Build->Profile... from Visual Studio IDE menubar. In the Profile dialog displayed you can choose any of the available profiling types then application will run. After the operation quit the application and check the Visual Studio Output window. Following are different types of profiling,
- Function Timing - The Function Timing option in the Profile dialog box profiles the current project, recording how many times each function was called (hit count) as well as how much time was spent in each function and called functions.
- Function Coverage - profiling is useful for determining which sections of your code are not being executed. The profiler lists all profiled functions, with an asterisk (*) marking those that were executed.
- Function Counting - records how many times each function was called (hit count).
- Function Attribution - Function attribution records information about who called a particular function by taking a snapshot of the stack on each function call. See more details here.
- Line Counting - records how many times each line was called (hit count). To start a line count profile, use a custom batch file that specifies the source module and the lines to profile.
- Line Coverage - Line coverage profiling is useful for determining which sections of your code are not being executed. The profiler lists all profiled lines, with an asterisk (*) marking those that were executed.
Visual Studio 6.0 Profiler

Function Timing Profile sample output
        Func          Func+Child           Hit
        Time   %         Time      %      Count     Function
---------------------------------------------------------
   53153.728  99.5    53314.866  99.8       56 CWinThread::PumpMessage(void) (mfc42.dll)
      136.579   0.3      136.964     0.3      176 CWnd::DefWindowProcA(unsigned int,unsigned int,long) (mfc42.dll)
Function Coverage Profile sample outputCovered Function
----------------
* AfxEnableControlContainer(class COccManager *) (mfc42.dll)
* AfxFindResourceHandle(char const *,char const *) (mfc42.dll)
* AfxInitialize(int,unsigned long) (appmodul.obj)
. AfxMessageBox(char const *,unsigned int,unsigned int) (mfc42.dll)Note:By default Profiler profiles the entire dlls loaded and all .obj files linked. We can restrict the same by specifying exclude for unwanted libraries and obj files to be profiled. For that what you need to do is take the Profile.ini from Visual Studio installed location, Microsoft Visual Studio\VC98\Bin\Profile.iniand add 'exclude:libraryname.lib' or 'ObjectFileName.obj'.See more profiling tips here.
Sunday, February 1, 2009
[VC++] Preventing multiple instances of your application running at same time
Suppose you do not want to have more than one instance running at a time in your program then here is how can you do that. Use the below code at the begining of your application class' Initinstance() function. Now if you try to start a second copy it will show a message box saying "Application already running" and will exit.
Idea is very simple, create a mutex with some name and if you try to create mutex with the same name (from same or any other application) then it will fail. Only thing you need to bother is of choosing a unique name for mutex !
    HANDLE hMutex = 0;
 hMutex = CreateMutex( 0, TRUE, "SomeUniqueNameHere" ));
    if( ERROR_ALREADY_EXISTS == GetLastError())
    {
        CloseHandle( hMutex );
        AfxMessageBox( "Application already running" );
        return FALSE;
    }
[VC++] Getting your application's full file path name
For getting the path name to your application you can use GetModuleFileName() API. Below code snippet shows how to obtain the same and display the same in a messagebox !
TCHAR szModulePath[MAX_PATH];
GetModuleFileName( 0, szModulePath, MAX_PATH );
MessageBox( szModulePath );
TCHAR szModulePath[MAX_PATH];
GetModuleFileName( 0, szModulePath, MAX_PATH );
MessageBox( szModulePath );
[VC++] Preventing your dialog disappear on ESC/Enter key press
If you are new to MFC dialog applications one thing you find irritating will be your application getting close on pressing ESC key or Enter key ! For preventing this what you need to do is over ride virtual OnOK() and OnCancel() in your dialog class.
Add below code to your dialog class(say CMyTestDlg) header file for overriding OnOK() and OnCancel(),
virtual void OnOK();
virtual void OnCancel();
Add empty implementation for the declared functions,
void CMyTestDlg::OnOK()
{
}
void CMyTestDlg::OnCancel()
{
}
Then its done ! You don't need to worry any more about your dialog application disappearing on pressing ESC or Enter key.
Subscribe to:
Posts (Atom)


